Have you ever ever puzzled why {most professional} and academic shows embody a hierarchical diagram that explains ideas in a fowl’s eye view? Nicely, that is named a thoughts map and is a particularly essential software for everyone!
A thoughts map is among the most beautiful instruments for organizing and understanding data. It lets you contextualize information and spotlight key phrases and vital factors. It’s extensively utilized by individuals from all walks of life, together with college students, academics, designers, entrepreneurs, managers, and top-level executives.
If you happen to discover it tough to create a thoughts map in Google Slides, here’s a tutorial the place i’ll stroll you thru the fundamentals and enable you create a shocking thoughts map!
Organizing Your Thoughts Map
The primary intention of a thoughts map is to interrupt down advanced matters into less complicated and shorter ones for ease of understanding. Earlier than making your thoughts map, the important thing step is to plan and arrange the problems you would come with.
You’ll be able to start with a central thought in the midst of the thoughts map, draw branches round it to say its sub-topics, and additional add particulars to it by creating extra parts below the sub-headings. This could mean you can divide data and simply bear in mind it.
For example, whereas crafting a thoughts map for a Historic Period, you may write the period’s identify within the center, point out totally different durations on the branches, and jot down respective occasions below them.
Creating the Central Concept
That is the highest hierarchy degree in your thoughts map or the primary idea. Allow us to perceive how we will create this with the instance of a Language Studying thoughts map.
Step 1 – Open your presentation and hop onto the slide the place you wish to create your thoughts map.
Step 2 – Go to the toolbar, click on on ‘Insert’ and choose ‘Textual content Field.’ Kind the heading of your thoughts map.
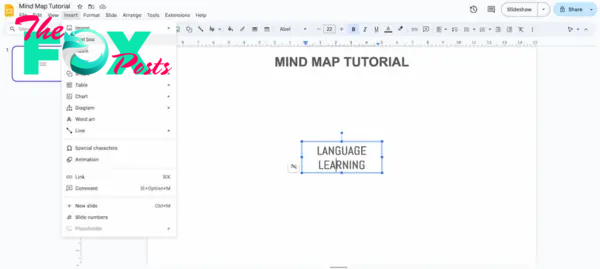
Step 3 – You’ll be able to edit the textual content utilizing varied modifying choices from the toolbar. You’ll be able to regulate the font, measurement, coloration, and extra in response to your selection.
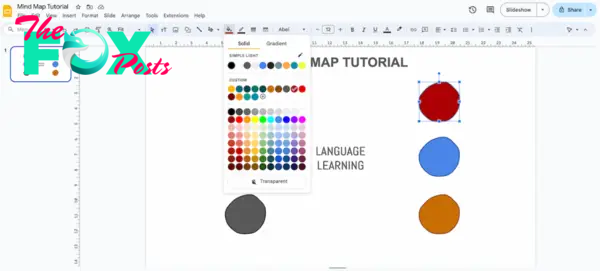
Including Branches to the Thoughts Map
Allow us to add the branches with sub-topics to our thoughts map.
Step 1 – Plan the variety of branches that you simply want. For example, we want six branches representing varied steps to study a language.Step 2 – Allow us to add shapes to our sub-topics. Click on on Insert > Shapes > Shapes >Rectangle from the toolbar dropdown menu. In order for you your shapes to seem like hand drawn shapes, Click on on Insert > Line > Curve. You’ll be able to simply make a hand drawn circle.

Step 3 – Click on and drag to regulate the form and its measurement. You’ll be able to fill in coloration, add borders, and edit it per your requirement.
Step 4 – Add one such form to every department or you may merely copy and paste the shapes. Step 5 – Click on on the form, and an overview in blue will seem. Begin typing your sub-headings right here in form.
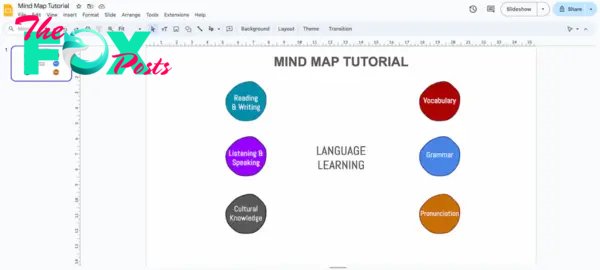
Including Extra Data to the Sub-Headings
Allow us to write extra about sub-topics beneath them and create a extra informative thoughts map.
Step 1 – Go to the ‘Insert’ choice on the toolbar, and choose ‘Textual content Field’ from the menu. Add a textual content field below every sub-heading. Or if you wish to make it extra artistic you may scribble a form which can once more seem like a hand drawn form. Click on on Insert > Line > Scribble

Step 2 – Write the required data, and your thoughts map is prepared!
Including Connectors or Arrows to Your Thoughts Map
An efficient thoughts map combines colours, fonts, connectors, icons, and illustrations. Right here, we are going to add arrows connecting our most important thought to its subheadings.
Step 1 – So as to add an arrow connector, click on on Insert > Line. Select the kind of line you want to insert. Once more you may create a hand drawn line form. Click on on Insert > Line > Scribble
Step 2 – Alter the strains and align them with the branches.
You’ll be able to go for curves as an alternative of arrows and play with colours, designs, line weight, and density with the assistance of the modifying choices on the toolbar.
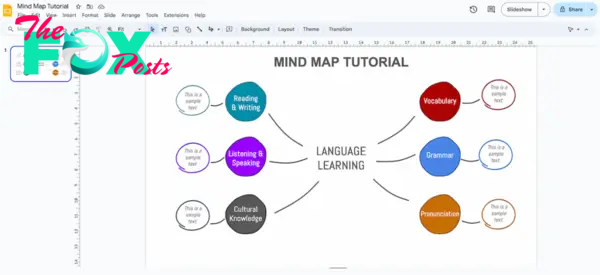
Your thoughts map is prepared!